A Simple Quest - Part II
A Simple Quest - Part II
Introduction
In my first tutorial, you learnt how to build a simple 'Go fetch!' quest using the Conversation Editor and the Script Wizard, without having to actually write a single line of code. In Part II, you will learn how to add Journal entries for your quest, and how to make your module multi-lingual. We will make a simple modification to change the quest from a 'Go fetch!' to a variation on the 'Go kill!' theme. While we're at it, we'll look in on Area Transitions, and the Faction Editor on the way.
Prerequisites
Like any Tutorial, I have to assume some knowledge. I've tried to pitch it for everyone, but there are some concepts I can't get by without. They are detailed in part one, which you will be building on, so there's only one real prerequisite (apart from owning NWN):
- Complete Part I You should have a test module complete with Plott, a Doohickey of Destruction, and the conversation as constructed in the first tutorial. You should have tested the module, and have the Quest working.
Tutorial
Preparation
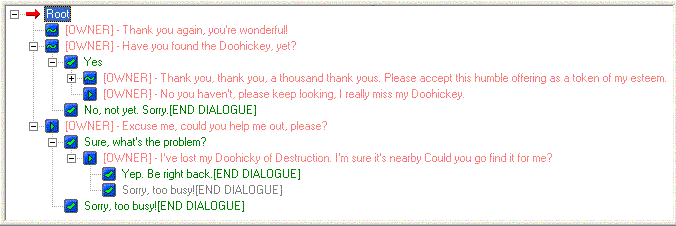
You should already have a conversation tree that looks like this:
The Journal
You've built a quest, and now you want to give the PC an easy way to track the quest. Happily, NWN comes with a Journal, and unsurprisingly, there's a Journal Editor. Open it up now, and have a look. Having got used to the Conversation Editor in the first part, the Journal Editor will look reassuringly familiar, if even easier. Your module's Journal (there's only one per module) only allows two types of entry, the Journal Category, and its Journal Entries. The Journal Category gives you the general heading you see in the client's Journal screen, the Journal Entry is the larger text that describes what's going on in more detail. To give yourself Journal entries appropriate for Plott's quest, you will create two entries: one for 'started' quest state, and one for 'completed' state. Here's how to set them up:
- Open the Journal Editor
- Click on the 'Add' icon to add a single node. This will be your Journal Category; it will be created with a default Name and Tag, and set to the lowest priority.
- Change the Name to Plott deVice's Problem. This is the heading in the client Journal under which all your detailed plot update descriptions will appear.
- Change the Tag to journal_plotts_quest. If you assign journal entries with the Conversation Editor (as you will in a minute), you won't need this tag. If you want to make journal entries with custom scripts, however, this is the reference you will be using.
- By default, Plott deVice's Problem is the lowest priority. Journal entries can be sorted by their priority in the NWN Client. It is up to you to decide which quests a player should consider most important - or if you want to give them that much of a hint.
- Now highlight your new node, and click the 'Add' icon twice. The Journal Editor will create two Journal Entries for you, with default names. Each entry has three features: an ID, some Text, and a Quest Completion Flag.
- First change the IDs. By default, the Editor will create consecutive numbered IDs, but it is a good idea to leave room for expansion later, so change the tags to 100 and 200. Notice that the main pane of the Editor will sort itself as you do so.
- Now, to fill in the Journal Entry Text: highlight the first node again, ([0100]), and write in the Text box something like "Plott deVice has lost his doohickey of Destruction. You've promised to find it for him."
- Click on the second node ([0200]), and give it a description along the lines of "You've found Plott's Doohickey, and returned it to him. He gave you some gold for your trouble - what a nice chap."
- Finally, check the 'Completed' box for the second node. This tells the engine that the quest is done when this Journal Entry is set, and moves the Journal Category from the 'Active' leaf of the Journal, to the 'Done' leaf.
- Your journal should now look something like this:

- Click on the 'OK' button to close the Editor
Linking The Conversation and the Journal
Now you've constructed the two Journal entries, let's get the Toolset to add them to the Player's Journal at the right moment in the conversation with Plott. Once you know how, this bit's easy as falling off a log:
- Open the Conversation Editor
- Select the Yep. Be right back. node.
- Click on the 'Other Actions' tab in the bottom right corner of the Editor.
- There are two drop-down boxes underneath 'Journal', from the first one, select the only Journal Category, "Plott deVice's Problem".
- The second one gives you numeric choices for the Journal Entries you created. Since there are only two so far, it shouldn't be too hard to remember that 100 is the quest's "started" state Entry, so leave it selected.
- Notice, while you're there, the Edit button, which will open the Journal Editor directly; very useful for adding Journal Entries as conversation inspires you, or checking up on your Entry numbers.
- Now click on the Thank you, thank you, thank you.... node, and give it Journal Entry 200.
- While you're there, let's have some fun, and make Plott absurdly grateful to you. In the 'Play Animation' drop-down box, select the 'Worship' animation. (Feel free to go back to other significant conversation nodes, and add animation to them... maybe 'Talk Pleading' would go well with the "Have you found..." line. Don't overdo it, though: sometimes 'less is more' - you don't want to make all of the actors in your module total hams!)
That's all there is to it; I told you it was easy! Why not open up the client and check that the Journal now updates when you're assigned the quest, and that it completes when you give Plott his Doohickey back.
Multilingual Modules
Internationalisation (or i18n as it is often abbreviated) is something you might think is difficult, but the folks at Bioware are cunning - and appreciate the international market, even if the nature of international shipping and the Laws of Physics give some people a differing perspective. As you will see, the hardest thing about i18n in NWN is getting your text translated. Fortunately for me, almost as soon as Part I was published, a very cool person translated it into German. Hence this quick lesson:
Another neat feature
You'll notice that there's a Male/Female choice that's available in some languages, but greyed out for English. In many languages how you say something depends on the gender of the person you're addressing. NWN is cool enough to keep track of all of that for you - provided you've got the translations!
- Open the Conversation Editor
- Highlight the first node, Thank you again, you're wonderful.
- At the bottom of the Editor, to the right of the 'Text' box is a button with an ellipsis. Click on it.
- Select 'German' and type Danke nochmals, Sie sind der Beste. into the text box.
- Click on 'OK', and when someone playing the German version of NWN runs you're module, Plott's last words will be in German.
- A lot of text in NWN is configured for i18n, including NPC names, item names and descriptions, and Journal Categories and Entries and so on. If you're cool enough to be a polyglot, keep an eye out for the i18n ellipsis, and make your mods multilingual!
- If you want to finish off Plott's German dialogue, use the German translation of Part I
Go Kill! - The Easy Way
One of the most common complaints I've heard since writing Part I is that 'Go Fetch!' quests are all very well, but what if you want to make a 'Go Kill!' quest. The bad news is that you can't create a pure and simple 'Go Kill!' quest without some scripting - which I've tried to avoid so far. The good news is that, using a slight variation to 'Go Fetch!', you can achieve the satisfying elimination of an unwanted foe with no scripting by hand! Unsurprisingly, you need a second NPC (or a monster - no difference, really) for Plott to have you kill. To give Plott deVice some depth (about as much, say as a puddle after a light shower), paint another NPC, and call her Ai von Kallink. We'll imagine that there's some long-running feud between their two families, and that they're both now after each others' blood.
How Shallow is This?
The quest so far is pretty trivial, but it doesn't need to be. This simple format can be the foundation for some very compelling story-telling, and that's what NWN is all about. (If you haven't figured it out already: 'cheating', power-leveling, munchkinism and twinking are so easy with NWN that they're utterly pointless). But indulge me, and imagine you're creating a campaign setting. I maintain that a 'Go Fetch!' quest with fatal variations could be used to define new (Server Vault) characters' Alignment - based on their behavior - not an arbitrary choice. Think about it. You're players are asserting in their PC creation screen that they're going to behave a certain way - and the game is able to effect changes on them if they 'stray' from that choice.
Consider populating your prelude what - at first blush - looks like a simple, get-you-to-level-2, 'Go Fetch!' item quest. But then, the person who has the item claims its hers, and the local priest of a Lawful god says it belongs to the City. The initial NPCs neighbors say he's a gentleman, and kind-hearted, but there are rumors in the tavern that all is not what it seems. The second NPC has a so-so reputation, but is a devout member of the priest's flock, and sponsors the local militia. In fact, the prelude is populated NPCs who have conflicting stories about the item... and the PCs alignment will be decided by his decisions about where the Item ends up, and who (if anyone) he kills.
Of course, you would have to establish a genuine story for the Item, and write dialogue and characters that could be determined to be honest or lying, prejudiced or impartial, a path through the quest that the genuine Lawful Good Paladin would get right (or fall if he kills the wrong participants). It is no mean feat to balance that conversation right, and you'd want to make sure you warned players what they were getting into in your module description, but the possibilities are huge.
Great modules will succeed by breaking the NWN paradigm
Variation 1: 'Go Kill - and Prove it!'
This trick is all in the title. If you were a diligent follower of Part I, you've already figured out how to turn Plott's quest into a 'Go Kill - and Prove it!" quest, especially if you played the original Baldur's Gate and got the hint about the Bandit Scalp. It is as simple as giving a third party an item that the quest initiator wants. Building on our previous work, you're going to modify Plott's quest, so that it leads to Ai von Kallink's doom.
- Open Plott deVice's conversation in the Editor, and highlight the I've lost my Doohickey... line.
- Change the line so it reads That evil hag Ai von Kallink has stolen a precious family heirloom - the famous Doohickey of Destruction. Can you recover it for me? You may need to ... er ... persuade her to give it back.
- Leave the rest of Plott's dialog (and the Journal entries) for now, and close the Editor
- Edit Ai von Kallink's Properties, and look at the first tab, 'Basic'
- Open her Inventory (the button under her model), and give her a Doohickey of Destruction. Make sure it is flagged as 'plot', and 'droppable'.
- Close the Inventory, to return to her properties.
- Still on the 'Basic' tab, click on the 'Edit' button in the 'Conversation' section under her portrait.
- Give her a single line of conversation, You've come for the Doohickey, haven't you, you scum? Tell Plott he'll get it over my dead body!
- Add another node below that, and delete its default text, leaving only [END DIALOGUE]
- In the 'Actions Taken' tab, click on the Wizard's Hat to start the Script Wizard
- Check the 'Perform an Action' box, and click 'Next'.
- Select 'Attack'. Notice that this option automatically ruins the PC's reputation with every member of the NPC's faction. Click 'Next'.
- Save the script as 'dlg_avk_01', and save the conversation as 'dlg_aivonkallink'.
- Close Ai von Kallink's properties, and save the module. (Incidentally, I strongly recommend you save your module regularly, and back it up, too).
- We've set up Ai so she has a one-liner conversation, and launches an attack at you as soon as you click 'Continue' - a surefire way of getting herself killed.
- Test the module as it stands.
Problems?
You may discover a small problem. Once you've made mincemeat of Ai, and recovered the Doohickey, Plott is reluctant to talk to you... in fact, he's outright hostile, and you don't even have the option to talk to him... and you though he wanted her dead. The problem is that they're both in the same Faction. Note: if you've used certain blueprints for Plott and Ai, they won't necessarily be in the same Faction. To see this problem in action, go to the 'Advanced' tab of their properties sheet, and change their Faction to 'Commoner'.
Factions, or 'Why Are All the Guards Trying to Kill Me?'
When you told the Wizard to make Ai attack you after she'd mouthed off, it made her whole faction hate you too. If you used some of the regular NPC blueprints, the chances are that both Ai and Plott were in the same Faction, 'Commoner'. Factions are used for some of the coarse-grained behavior in NWN. Each Faction is given a set of numeric values between 0 and 100, each representing that Faction's opinions of every other. Let's have a look at Factions now:
- Open the Faction Editor. (Tools > Faction Editor or Ctrl+Alt+F)
- You will see a bar chart. Before looking at the chart, look to the list of Factions at the right. Each checked faction will appear across the bottom axis of the chart. The (single) highlighted faction will be the faction whose opinions are being plotted. The vertical axis of the chart shows you the value of the highlighted values opinions.
- Check all the boxes, and highlight 'hostile', as an example. Only one bar shows up... above the 'hostile' faction, and it is totally full - at 100. This means that members of the hostile faction are friendly towards other members of the hostile faction.
- Click the chart somewhere above the 'PC' label on the bottom axis. Notice the descriptive text at the bottom of the window changes to 'Hostile is hostile toward PC'. Creatures that are hostile to a creature of a give faction will tend to attack them.
- Just for kicks, click on the bottom axis of the chart above PC, and drag your mouse to the top. As you drag, a bar will appear, and change color from an angry hostile red, to a friendly blue color. If you leave it at the top, the status bar will now tell you that 'Hostile is friendly toward PC'... members of the Hostile faction (that's most of the monsters) will now attack your attackers.
- Restore the Hostile faction to being hostile to PCs
- Click on the 'Full Detail' button. Now each labeled faction has two bars - one showing how the highlighted faction feels about the labeled faction, and the right-hand bar showing how the labeled faction feels about the selected faction
- Select the 'Defender' faction. Notice that Defender is friendly to Commoner, but Commoner is impartial to Defender. This is why Guards will attack you when you hit a peasant, but Commoners won't rally to the defense of Guards.
- Notice, incidentally, that you can't set the PC's opinion of any faction - which is as it should be. It is up to the player to decide whether to be friendly or hostile to any given NPC.
- Let's add a new faction for Ai, so Plott doesn't automatically become hostile when you bump her off. Click 'Add Faction'.
- You get to name your faction (call it 'vonKallink'), and also select a 'parent' faction, which determines the defaults for the new factions opinions.
- Select 'Commoner' (which is the faction most like to what we want) and click 'OK'.
- Have a look at her chart - she's hostile to monsters, friendly to other vonKallinks and Commoners, and impartial to everything else.
- Make her impartial to Commoners as well. You don't want Ai flying off the handle if you decide she's in the right and want to give Plott a pummeling instead.
- Now select the 'Commoner' Faction, and make them impartial to vonKallink. Now you've got a new Faction that really won't be fussed if you bump Plott off, and vice versa
Bear in mind that if you create an item called 'Ai von Kallink's severed head', and leave it as the only droppable Inventory item that Ai leaves behind her on her untimely demise, most players will pick it up without thinking - they understand how the game works (but see How Shallow is This?, above). You won't need to give Plott a conversation node that says Bring me the head of that harridan, Ai von Kallink, you'll just have to arrange for her demise.
Area Transitions
So far, you've only been working in one area - and that can be a little dull for players. Now, you're going to add a new area, move Ai von Kallink to the new area, and set up Area Transitions between the two areas so the players can move either way. You're going to do this the easy way, using Doors. I'll cover other Area Transitions another time.
- Depending on the tileset you used, you may or may not have somewhere to add a door. If you're indoors, add a doorway from the Features of the "Paint Terrain" set, otherwise add a group that's got a door space.
- Once you've got a doorway, add a door. When you move your mouse cursor near to the doorway, the neat spinning door will 'snap' to the doorway. Paint it in.
- Edit the door's properties and change its tag to doorPlottExit. Door tags can be confusing, so choose a convention for your modules and stick to it.
- Save the Area, and start the 'Area Wizard' to create a new one.
- Create a small Forest Area, and call it something snappy like 'Outside'.
- Add a 'Lodge 2x2' group in the middle of the area (feel free to take some artistic license here... just make sure you've got at least one doorway on the map before...
- Add a Door to the doorway of the Lodge
- Edit the Door's properties, and change its tag to doorPlottEntrance. Don't worry if your first area was also outside, or isn't appropriate for Lodge interior. It won't matter to the engine. Your players might find it weird, but hey, change its name to 'Spooky Door', and give it a description like 'The hairs on your arm stand on end as you reach a tentative hand towards this door... is that the sound of screaming in the distance?', and all will be forgiven.
- Go to the 'Area Transition' tab. You could do this bit by hand, and set the destination and type of each door manually... but these tutorials are all about exploring the easy ways to do things first.
- Click on 'Setup Area Transition'
- The wizard kicks off by default with the current area, 'Outside' (if you followed my lame suggestion, as the 'Target Area'. Change that to the name of your first Area.
- Make sure the Target Type is set to 'Door'.
- You'll see a list of available doors in the Target Area. Select doorPlottExit, and you'll see the door highlighted in the wireframe model to the left. Cute.
- Set the Connection Type to 'Both Ways'. This makes the toolset configure a one-way transition on each of your two doors, linking them.
- Click 'OK', and 'Yes' if you're asked to save the Area.
- Go back to your first area, and select Ai von Kallink.
- Use Ctrl-X to 'cut' her, and switch to the 'Outside' Area.
- Use Ctrl-V to 'paste' Ai, and paint her somewhere appropriate.
Now go test your module. Check the door transitions, run the quest, and have a ball!
Exercises for the Reader!
Some more suggestions to trigger ideas, no scripting required:
- Find a pretext to give the option to have the PC go back to Plott after first speaking to Ai, and then go kill her.
- If the PC takes the long way, perhaps Plott should reward them with more XP and less gold?
- Give the 'deVice' family a faction. How would you make the deVices and vonKallinks attack each other on sight?
- Create a module in which all the monsters hate each other and fight each other to the death
- Set the deVices and vonKallinks up to be in a state of cold war, and fix Plott and Ai's dialogue so that the PCs actions could either reconcile the families, or descend into all-out war? (Hint: Look at the options available in the 'Actions Taken' wizard)
- Could you recreate Romeo and Juliet in NWN?
Coda
I hope this is of use in getting you started on the path of NWNToolset Wizardry, and Script Sorcery (man, I'm corny). If you find an error or typo, or want to publish this somewhere, please let me, Iskander, know by PM'ing me on the Bioware Boards (http://nwn.bioware.com/forums/).
author: Iskander Merriman, editor: Charles Feduke, Mistress, additional contributor(s): Palme (German translation)